How Chroma Calibration Works
During factory chroma calibration, a camera system measures the color output and brightness of every single pixel to calculate the perfect calibration coefficients for a homogeneous image. Due to high production volumes and the finest nuances in the calibration process, minimal deviations can occur in practice. We analyzed these details and divided our panels into five different color families.
The good news: Since all modules are absolutely identical in hardware, the stored calibration values only control the mixing ratio of the primary colors red, green and blue. For a homogeneous overall image on your LED wall, the color ratios of these families simply need to be matched to one another.
How to find the right values:
Since we have already assigned the individual color families in advance, you can quickly and easily determine the matching correction values using our provided tool. For this, we work with calibration numbers of the modules or tiles:
Stickers on modules and tiles: You will find stickers with a unique calibration number both on the frame of the modules and on the individual tiles.
Using our online tool and the following guide, you can look up the exact correction values based on these numbers and carry out the fine-tuning quickly and easily yourself.
Note: This number is not the serial number, but the exact assignment number of the module or tile in our calibration database.
Before You Start: Is It Really a Calibration Issue?
Slight color or brightness differences aren't always caused by different values stored in the calibration. To save you unnecessary work, please briefly check the following points before investing time in the color adjustment.
- Different brightness values: Adjust the brightness across the entire wall so that all modules are set to the same brightness value.
- Differing color spaces: Check the ImageBooster settings – individual modules might be working in a different color space.
- Differing firmware versions: If in doubt, send the current .NCP file from our website to all modules again.
Requirements for the Color Adjustment
You should make sure of these points before starting the manual color adjustment.
- Software installation: Download and install the current NovaLCT version from our website or at ledtek.de/downloads.
- Signal connection: Make sure there is an active video signal connection from the computer (running NovaLCT) to the Novastar controller.
- Basic configuration & firmware: The LED wall must be properly programmed into the NovaLCT controller. The current .NCP file must be identically installed on all modules.
How the Adjustment Works
Click on a step to see the details.
Important Note:
Read the calibration number directly off the back of the module or tile. The reference wall is always the color family that the deviating module or tile should be matched to.
Color Adjustment Tool
Choose the mode and enter the numbers to look up the color family values for the P2+sBL NEO.
Click on the tiles that need to be adjusted. You can select several and enter the calibration numbers.
All views and module arrangements in NovaLCT always correspond to the front view of the LED wall.
Color Adjustment with NovaLCT – Step by Step
Simply follow this guide step by step. Below you will also find a short explainer video as well as a compact quick guide available for download.
Log In
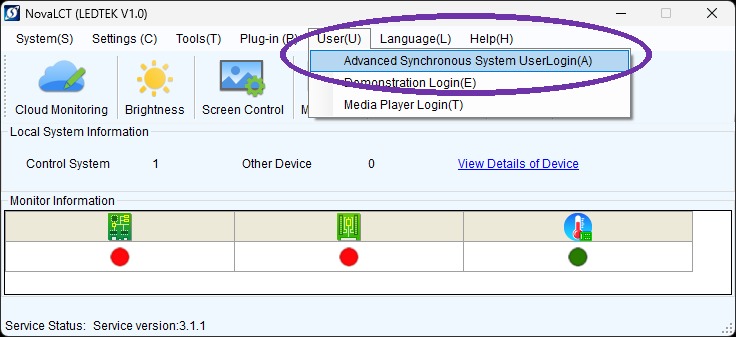
Open NovaLCT and navigate to User → Advanced Synchronous System User Login. Enter admin as the password and confirm with Login.
Open Calibration Menu
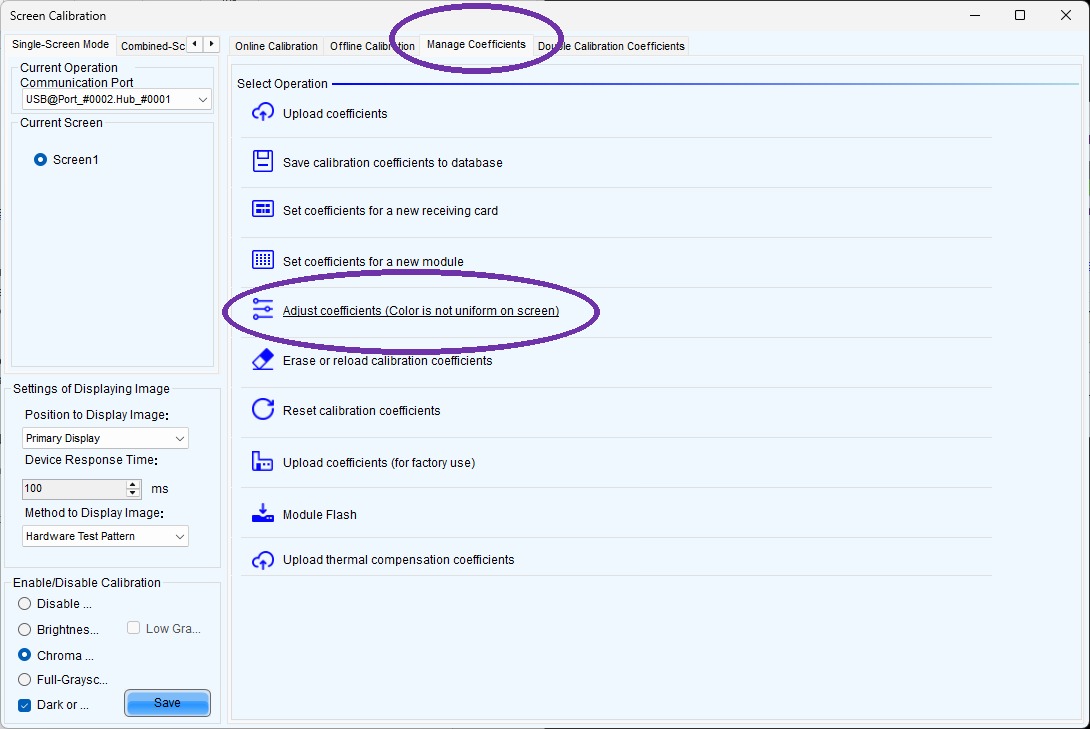
In the main window, click Calibration, select the Manage Coefficients tab and click Adjust coefficients.
Select Whole Module
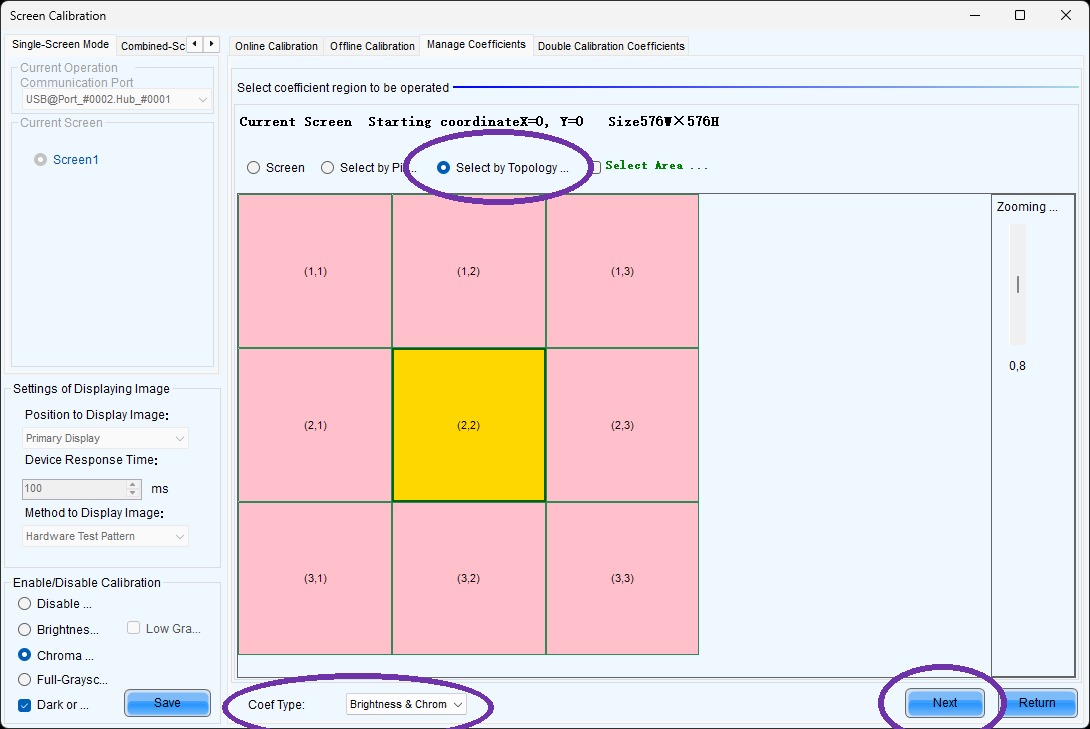
Set Select coefficient region to be operated to Select by Topology and Coef Type to Brightness & Chroma. Click directly on the affected module in the overview and confirm with Next.
Select Individual Tile
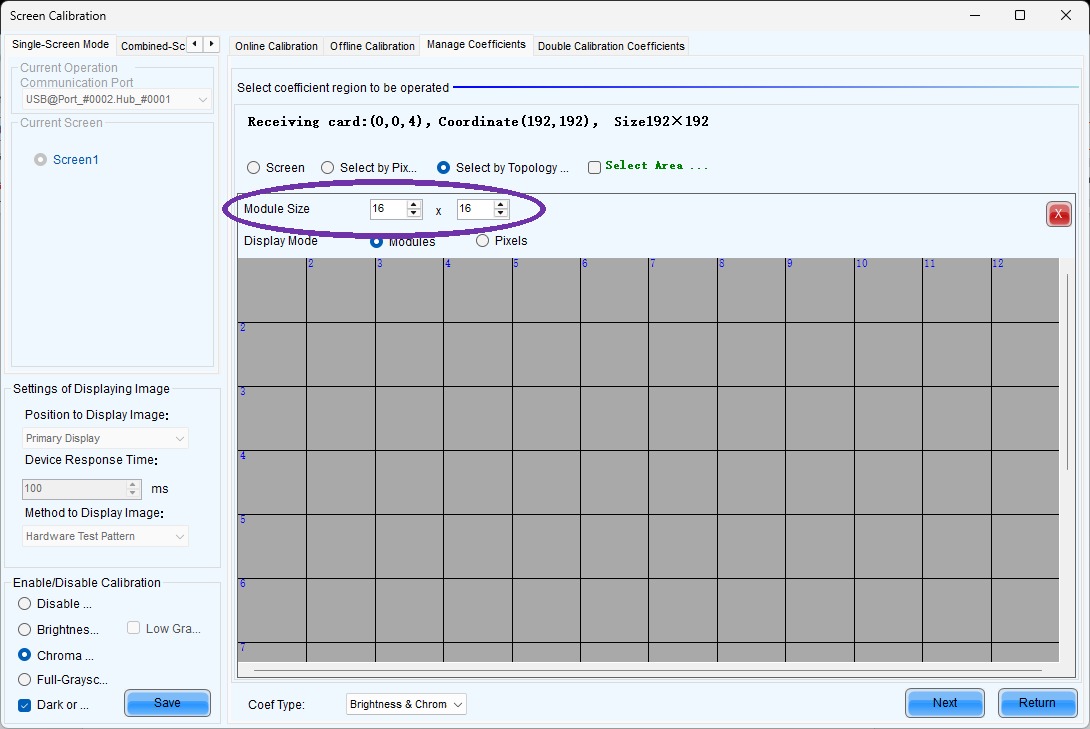
If you only want to adjust a single tile: double-click the module, enter 96 × 96 pixels for Module Size (P2+sBL NEO), click the tile and confirm with Next.
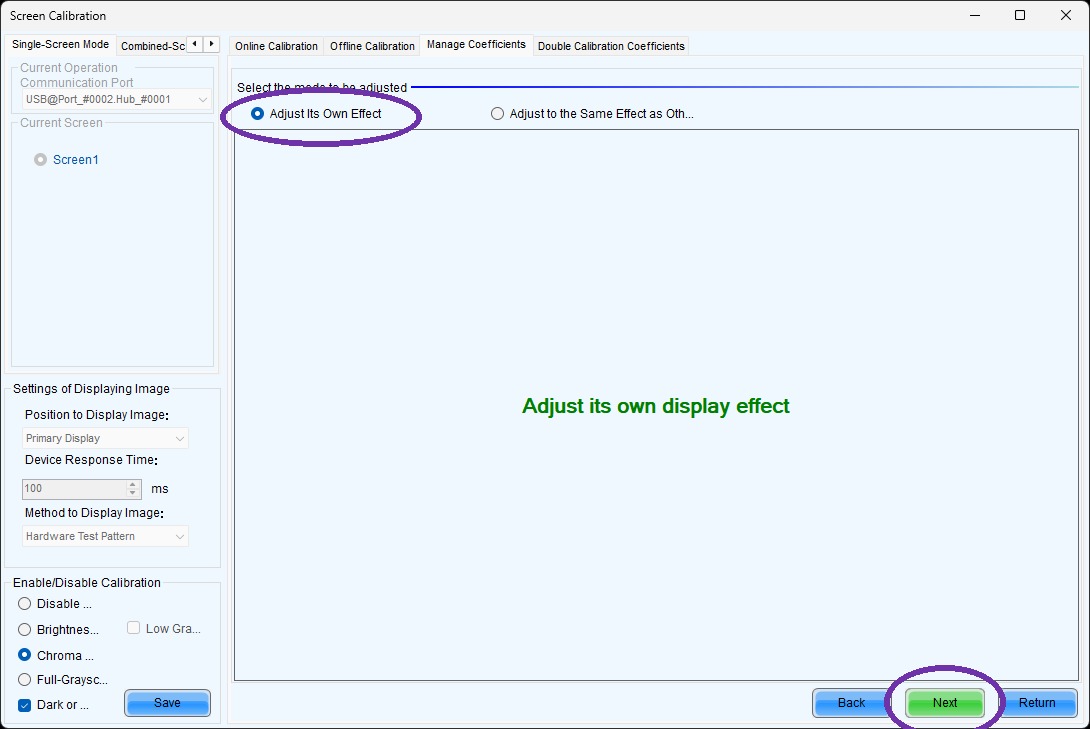
Confirm Adjustment Options
Leave the default setting on Adjust Its Own Effect and confirm with Next. The controller now reads the current coefficients from the module – confirm the window with OK.
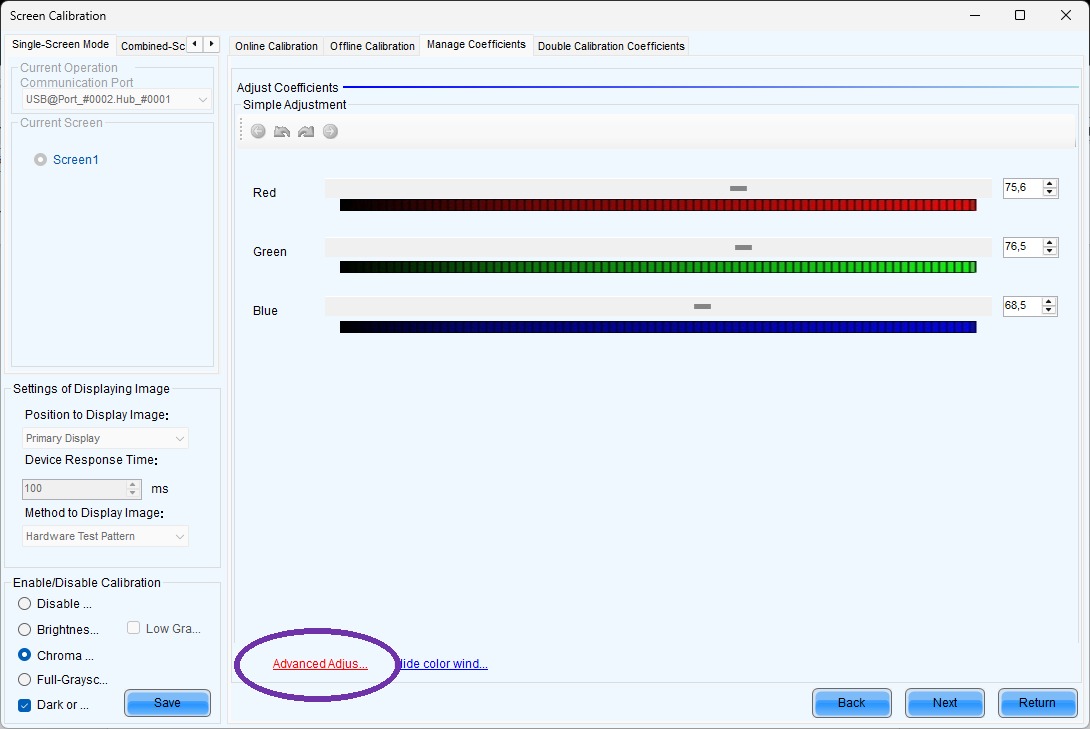
Open Advanced Adjustments
In the Adjust Coefficients window, click Advanced Adjustments to unlock the advanced color sliders for brightness, saturation and hue.
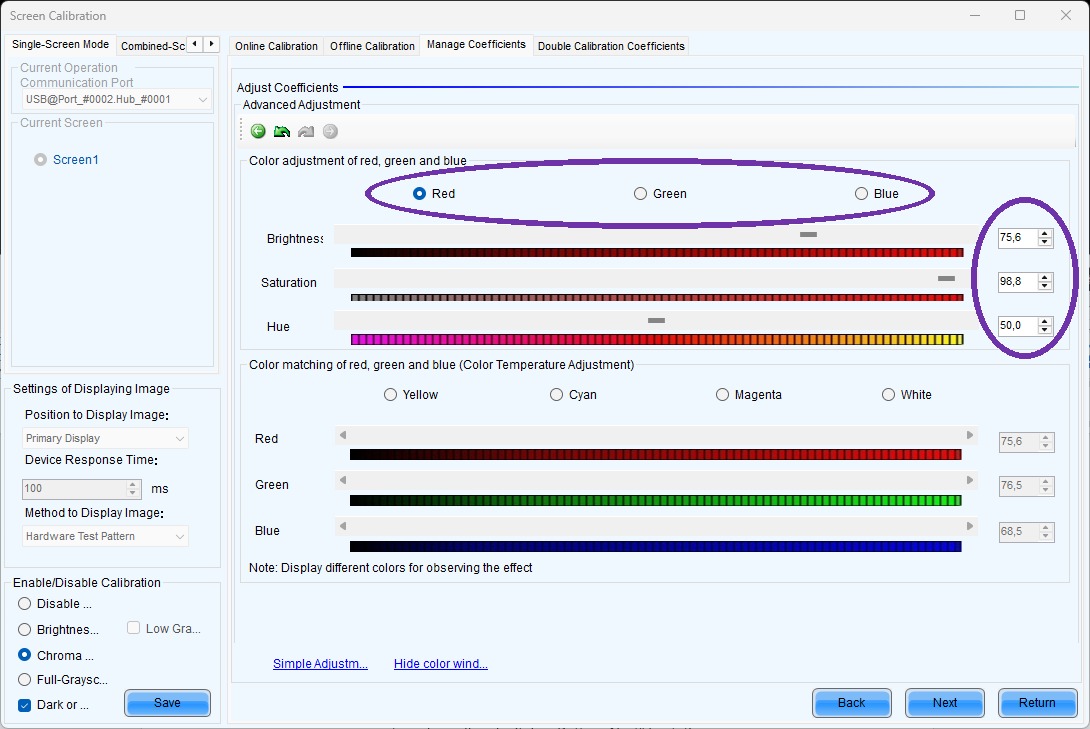
Perform Color Adjustment
Now the values from the tool above come into play: select red, green or blue and enter the matching values on the right – Value → Brightness, Saturation → Saturation, Hue → Hue. Repeat this for all three colors and compare visually with the neighboring modules.
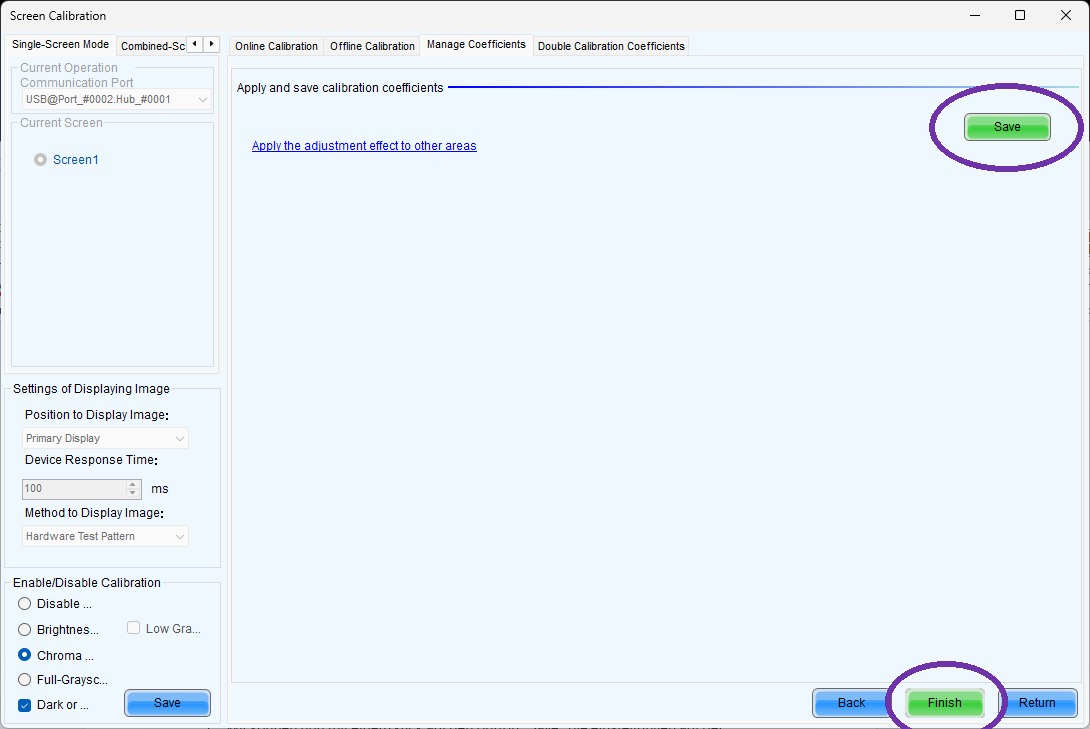
Save & Finish
Click Save to permanently store the values on the receiving card, confirm with OK and click Finish to complete the color adjustment.
Video Tutorial
Watch the color adjustment in the video – as a supplement to the step-by-step guide above.
Download Guide as PDF
The complete step-by-step guide to the manual color adjustment of the P2+sBL NEO for printing or reading offline.
Questions about Color Adjustment?
Our support team will be happy to help you with more complex calibrations.